|
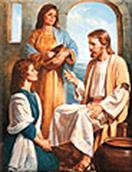
The Three Trees
Once long ago there were three trees on a hill in the woods. They were discussing their hopes and dreams when the first tree said, “Someday I hope to be a treasure chest. I could be filled with gold, silver and precious gems. I could be decorated with intricate carving and everyone would see the beauty.”
Then the second tree said, “Someday I will be a mighty ship. I will take kings and queens across the waters and sail to the corners of the world. Everyone will feel safe in me because of the strength of my hull.”
Finally the third tree said, “I want to grow to be the tallest and straightest tree in the forest. People will see me on top of the hill and look up to my branches, and think of the heavens and God and how close to them I am reaching. I will be the greatest tree of all time and people will always remember me.”
After a few years of praying that their dreams would come true, a group of woodsmen came upon the trees. When one came to the first tree he said, “This looks like a strong tree, I think I should be able to sell the wood to a carpenter.” And he began cutting it down. The tree was happy, because he knew that the carpenter would make him into a treasure chest.
At the second tree the woodsmen said, “This looks like a strong tree, I should be able to sell it to the shipyard.” The second tree was happy because he knew he was on his way to becoming a mighty ship. When the woodsmen came upon the third tree, the tree was frightened because he knew that if they cut him down his dreams would not come true. One of the woodsmen said, “I don’t need anything special from my tree, so I’ll take this one”, and he cut it down.
When the first tree arrived at the carpenters, he was made into a feed box for animals. He was then placed in a barn and filled with hay. This was not what he had prayed for.
The second tree was cut and made into a small fishing boat. His dreams of being a mighty ship and carrying kings had come to an end.
The third tree was cut into large pieces and left alone in the dark. The years went by, and the trees forgot about their dreams. Then one day, a man and a woman came to the barn. She gave birth and then placed the baby in the hay in the feed box that was made from the first tree. The man wished that he could have made a crib for the baby, but this manger would have to do.
The tree could feel the importance of this event and knew that it had held the greatest treasure of all time. Years later, a group of men got in a fishing boat made from the second tree. One of them was tired and went to sleep. While they were out on the water, a great storm arose and the tree didn’t think it was strong enough to keep the men safe. The men work woke the sleeping man, and He stood and said “Peace” and the storm stopped. At this time, the tree knew that it had carried the King of Kings in its boat.
Finally, someone came and got the third tree. It was carried through the streets as the people mocked the man who was carrying it. When they came to a stop, the man was nailed to the tree and raised in the air to die at the top of a hill. When Sunday came, the tree came to realize that it was strong enough to stand at the top of the hill and be as close to God as was possible, because Jesus had been crucified on it. Author Unknown |
|
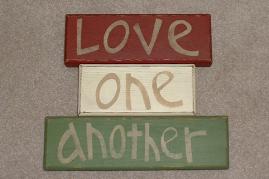
“Super Saturday” Projects Instructions Stacking Blocks – Love One Another - 30-45 minutes for this project. Love one Another in a burgundy/cream/green combination. These we did for $8.00. The hardest part was cutting the word templates. Do this ahead of time for the sisters with a razor knife. Paint two coats of color on each of the blocks, let dry. You can use stencil spray to help the template stick a little to the wood OR you can tape it down on all four sides of the block. Gently sponge on the taupe color for the letters. You may have to go back and touch up a few letters. To antique it, sand corners of blocks and then rub down with a stain. We used MINWAX Wood Finish stain in the color Early American 203. Just rub it on with one cloth all over, and rub off with dry towel. Don’t let it get on your clothes! It darkens the burgundy color just a shade. I can email you file for the word template. This could be done for many seasons: Happy (pumpkin picture) Halloween – in orange and black, Happy (bunny picture) Easter – in pastels, Merry (Tree with presents all around) Christmas, etc. We had someone in our ward finishing their basement and had lots of little 2x4 pieces. Another person in our ward had a cutter and router-edge that volunteered his time – it helped his wife was in the RS presidency! J
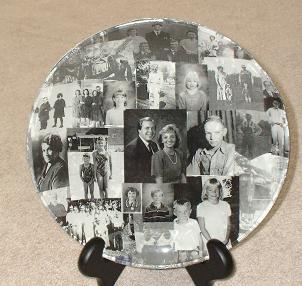
Memory Plates - We went to Honk's $1 store and got their clear glass plates with rounded edge. We had the sisters photocopy their pictures (only do black and white because the colors tend to bleed). The smaller pictures turned out better but took more time. We just had them put a thin layer of Modge Podge (any decoupage brand would work) on the back of the plate (the part touching the table when you set it down) and on the front of the picture, then layer on the pictures the way they want. Let it dry for 20-30 minutes then do another layer of MP over the pictures. Then with a sponge brush paint silver acrylic paint over it (this fills in any holes and looks great since it's a grey color against the B&W photos). This project is hand wash only!!! If you don't like it, put it in the dishwasher and it will all come off. Only $2 since sisters brought their own photocopied pictures.
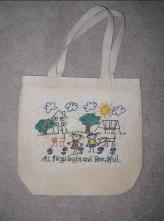
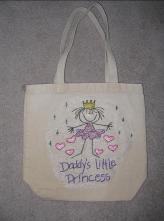
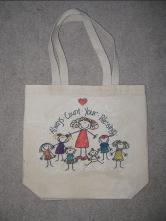
Canvas Church Bag - Allow 30 min. to complete. This adorable bag can be decorated any way you like and can be used for a tote bag, church bag, library bag, etc. Please note that actual size of bag will be 12 ½ by 12 ½ inches. These we did for $3.50. We got the bags at Robert’s for $1.50 after coupon I think. They have iron-on template books there also where you can iron on a B&W image and then go over it with permanent markers and/or puffy paint. You can use the images from the book over and over! I had each of my three kids pick the picture they liked best and then I made them for Christmas. For fun, I also did a clear/glitter over the picture to protect it a little more.
All Things Bright and Beautiful Daddy’s Little Princess Always Count Your Blessings
Reindeer - I don't have the instructions for this, I'm sorry. Our old Enrichment Leader was in charge of this one project and she moved many months ago. I know she had a friend who cut the pieces and she used the small package of Christmas lights, a wooded bulb with one side 1/4 sanded down flat for the nose and she also used the fake, squishy snow stuff they have at Roberts. That's the best I can help you on that one. I apologize. She charged $10 for these but this did not leave us any extra $ to help with paper goods.
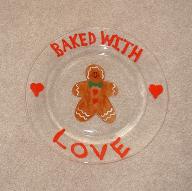
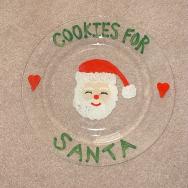
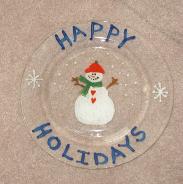
“I love to see the temple, I’m going there someday…” You could do a favorite scripture verse as well Holiday Plates - Same $1 plates from Honk's or any other dollar store with glass plates. These do NOT have to have a rounded edge. They have really nice plates at Bed Bath Beyond or Linens N' Things, put you pay the higher price. I can email you the templates I have of the patterns. Have the sisters cut these out and tape to the right side of the plate (the side you eat on) tape it at the edges and have them flip over the plate so you are reverse painting everything on the back of the plate. First have them wash the back side of the plate with a vinegar & water rinse. This will help the paint to stick to the glass. Let dry. Any small details need to be painted first and let dry before doing the next layer. For instance, "Baked" need the eyes, mouth, red cheeks, green bow, heart buttons and white frosting painted first. "Holidays" needs black eyes and mouth (use the end of the stick paint brush), green scarf, red heart buttons & hat painted first. "Santa" needs black eyes, red nose, mouth and hate, and white eyebrows paints first. Then paint white beard, hair and end of hat. Remind the sisters to reverse paint the letters. Let dry for 10 minutes and then lightly spray the back of the plates with a clear matte spray (outside). Hand wash only! I think we charged $3 for the plates to cover all the different colors of paint and different brushes. These plates were $2 at the store and we ended up buying them out.
*You might want to actually do the projects first so you will know how to better explain it to the sisters. I don't know how good I am at instructions, but I hope you get the idea of how to do these cute projects. We really saved a lot of money by having everyone in our Enrichment Board going almost every day and using the 40% off coupons. Any extra money was used for paper products for our potluck luncheon. Enjoy! |


Young Family Fun Pages |
|
Contact Information: Email: karenmareeyoung@msn.com |